
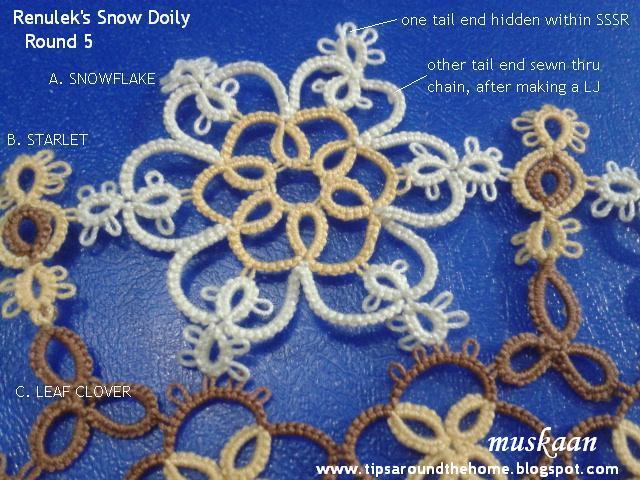
Round 5 consists of 3 separate motifs, joined to each other
& to previous round.
{ Motif 5A is a snowflake ; 5B is a starlet ; 5C is a leaf
clover for stability.}
Next there was the problem of colours – which colours to
use, how to show them up at the right places, how to hide a particular colour, and so on.
And of course, the problem of hiding multiple ends!
I tried to balance practicality with pleasure, trying to be
as precise as I could.
I would’ve liked to make at least the snowflakes ahead,
& join as I tatted Round 4. But the all-cream snowflake (shown in previous post) did not appeal,
hence shelved the idea. And I think it was a wise decision – the completion of
rounds 1-4 gave me a better perspective on choice & placement of colours. Pretty
happy with the outcome … wouldn’t you agree ? :-)
AND I got to learn a new technique, which Always
generates immense interest & excitement !
List of abbreviations
at end
* Click on titles/coloured font for links and pdf
A 2-round snowflake that can be tatted in one pass by using
split chain.
Techniques required : 2-shuttle tatting for outer round;
Floating/Thrown ring.
Techniques I used : FS/BS (RODS) tatting ; Floating Ring ; SSSR
; LJ .


Snowflake motif measures 2" in size 40 thread
Row 2 (cream) – Ended with an SSSR for one tail. For
other tail, I made a LJ to base for security & evenness ; then sewed under the chain
caps. (the tiny telltale tail-ends are
visible in above close-up pic)
TIP : One can use
tiny picots at base of the thrown rings, to anchor them. However, considering
that all 6 of these are joined to some part or other, I dismissed the idea.
Would’ve been even pretty fiddly, too. Practicality ruled.
Ditto for the long chains – these could use a very small
picot join at base (1ds away). But I kinda liked the flowery freedom &
precision was discarded for pleasure :-)
These are very tiny motifs, especially in size 40, for me.
Hence when these came up, I tried to use a little brainpower – surely they
could be tatted together ?! Easy with single colour, but with 2 colours, in
predetermined positions ?
There’s always a solution in our WonderTATland, isn’t there
;-)
I tatted the 2 parts together using Brown in SH1 &
yellow in SH2.
It can be started from either end ( I tried one starting
with clovers, followed by starlet) but I preferred starting with starlet &
ending with clover leaves.
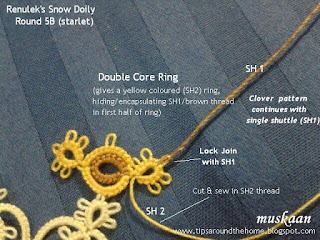
Learned & applied Double Core Single Shuttle Split Ring* to hide the brown in the yellow ring,
when moving from starlet to clover (main steps indicated in pics below).

Part of the Starlet is complete, joined to snowflake.
Now trying to hide brown within a yellow ring.

Instead of SSSR, one can continue with SH2 to complete the ring normally !
Then cut & hide yellow thread.

If one opts for a normal double core ring, then make a Lock Join with SH1
& start clover motif
Starlet, in size 40, is 1" long & less than ½” wide
(Alternate Method - Double Core Ring shown below)
****************

1st ring of clover motif is SSSR. I added anchoring vsp (9vsp1/1vsp9)
Yellow tail can be hidden within this ring or to previous yellow ring.

2nd ring of clover is normal, joined to adjoining vsp & then to Row 4

3rd ring is also normal. Cut thread & pass through centre to bring it to the back

Hide threads. Motifs 5B & C complete
3-Leaf Clover, in size 40, is ½”across
****************
Techniques required : 2-shuttle tatting;
Floating/Thrown rings; Onion Ring join ; Lock Join.
The 2 motifs are tatted separately in original pattern.
Techniques I used : FS/BS (RODS) tatting ; Floating
Rings ; SSSR ; CWJ (for onion ring join) ; LJ ; Double core SSSR and later, Double core Ring ; Reverse Join.
I tatted the 2 motifs in one pass, using 2 colours.
I tatted the 2 motifs in one pass, using 2 colours.
I have prepared a diagram, with instructions, to show how I
did this motif. Click to download file.

1. the double core is for part of the ring only

****************
Double
core SSSR – quite a mouthful, right?! And if one really deconstructs it, this is only partially applicable.1. the double core is for part of the ring only
2. the ring starts by using Two shuttles to tat ! And
3. one can complete the ring as a normal ring with the visible colour, as in this case.
This technique allows us to tat the complete ring in a single colour, while hiding one colour And positioning both threads as required. So in a SSSR, both threads emerge together at 'opposite' end, as in a split ring. But if one completes the ring as a normal ring, then the hidden colour emerges at one end, while the visible colour comes back to the base of ring !
It hit me almost towards the end, that for this particular pattern, why was I using SSSR after double core half ?! I could so easily avoid loop tatting by doing a normal ring for the 2nd half. The last few motifs were done in this manner :
Double core Ring

* I learned this technique by watching Karen's video (Lesson 43)
It hit me almost towards the end, that for this particular pattern, why was I using SSSR after double core half ?! I could so easily avoid loop tatting by doing a normal ring for the 2nd half. The last few motifs were done in this manner :
Double core Ring


This also gives me more options to hide/sew in the yellow tail !
Notice where the yellow thread is emerging in this picture : it is at the base of ring...
unlike in the double core SSSR, where the yellow thread emerges at opposite end, along with brown.
* I learned this technique by watching Karen's video (Lesson 43)
However, before posting here, I decided to do some more hunting. The first
place to look is always Jane
Eborall’s blog & sure
enough there was the tutorial on Double Core SSSR with Two Colours Or how
to crawl out of a round while using 2 colours and keep the SSSR one colour!
And that also revealed that this technique was originally conceived by TattingChic in 2009. Read all about that interesting
experiment & process (with pics) in her blogpost titled “A Tale of Two Split Rings” .
****************

I like how the brown clovers form a defined outline for previous round - almost like a large flower !

Measures around 11" in size 40, after round 5
Abbreviations
used :
SH –
shuttle
SSSR –
single shuttle split ring
fhs –
first half stitch
RODS –
reverse order double stitch for frontside/backside tatting.
LJ – lock
join
CWJ –
Catherine Wheel Joinds - double stitch


The brown doesn't quite show up against the blue background ; but colours get muted against the pale b/g !
****************
In Conversation ...
What I considered to
be ‘routine’ repetitive rounds after Round 5, have suddenly perked up my
interest.
As I was looking for
the stitchcount in Rnd 6, something sprung up that I’d missed earlier. Rounds 2
& 3 have the side rings facing in one direction, while rounds 7 & 8 face the opposite direction ! And I think my round 2 & 3 rings
face the ‘wrong’ direction ;-P
And the very latest
includes new learning again – Join to Smooth Side by Anne Dyer.
More about
these in next post .
Till then, happy
tatting :-)
Related Posts :
Snow Doily Rounds 1-4
Wow muskaan, it looks fabulous! I'm glad you managed to sort out all the conundrums that the colour choices presented.
ReplyDeleteThanks Jane :-D I'm very pleased with my colours & their placement in this doily !
DeleteI can see that would be a lot of ends to hide. Clever to combine the two smaller motifs into one, I would not have thought of that as a possibility.
ReplyDeleteAs you said, Robin, techniques excite me ;-P And we have a treasure trove of tutorials & tips that generous tatters have shared :-)
DeleteExcellent use of your skills to hide ends. I love how you take lots of pictures to explain each step. Your blog is very helpful.
ReplyDeleteJust following the masters, Bernice :-)
DeleteGlad the blog is helpful ... justifies the name of the blog ;-P
Yes,I agree with Bernice and I think these older patterns the women had less colors to choose from and so along with not being able to share techniques hindered the imagination. So nice of you and love to have you resources as a go to in tatting :0
ReplyDeleteYou make an excellent point, Carollyn ! Single colour tatting does not require all these new inventive techniques/tweaks :-) But then, it is such fun working with colours .
DeleteYes along with other modern conveniences, Although I thing there thread was better than our, I have some old work and tools with better workmanship than nowadays!
DeleteBeautiful, you did a great job with colours and techniques, thank you.
ReplyDeleteThat's looking so beautiful Muskaan, I think your mix of colours brings out the design even more and adds interest. Lovely work.
ReplyDeleteGorgeous! Love your use of colours :).
ReplyDeleteThank you Ninetta, Frivole & Jenn :-D
ReplyDeleteI am very happy myself, with the way the colours have worked out .... some learning from viewing all those wonderful doilies online, has finally seeped in, I guess ;-P
(Hugs)
Nice one !
ReplyDeleteThank you :-)
DeleteYour color combinations are wonderful! I enjoy reading your posts, because I learn so much from every single one. I'm amazed that you are able to put together such informative posts with beautiful pictures and clear instructions. Thank you for all you do. I'm learning a lot!
ReplyDeleteThank you so much, Diane ! I keep fearing the posts are too long (which they Are) & keep people from reading (we all have lives). But it is always a pleasant surprise when someone as inspiring as you stops by with such a sweet comment.
DeleteHugs :-))
Wonderful! What a complicated tatting lace.!
ReplyDeletehttp://tipsaroundthehome.blogspot.com/logout?d=https://www.blogger.com/logout-redirect.g?blogID%3D4725833531759425981%26postID%3D7193192264023626312
Wonderful!
ReplyDeletete convination of color is so nice.
Thank you so much :-)
DeleteThe pattern itself is not complicated ... Renulek's patterns are very easy & beautiful. Hope you give it a go
Wow! Muskaan. Thanks for such great tips and visuals. Big doilies are intimidating to me, but with your tips I feel inspired to try sometime. First, I need to practice with shuttle these techniques individually. I managed to designed my own big doily, nothing complicated though, but it's not done yet, and I am using needle and Japanese hooks to try to replicate techniques used with shuttles. Thanks for your generosity and for sharing your knowledge. Hugs
ReplyDeleteOh Laura, I always appreciate your enthusiastic support. Thanks so much :-)
DeleteNow I am Excited to see the doily you've designed ..... Wow that is Really something !
It can be a task, but you might be one of the few who can tat beautifully with all 3 tools & you might well be a trailblazer :-)