A QUICK-DESIGNING IDEA
aka
TATTERS LOVE TO PLAY !
What does a tiny heart filled with love do ? It multiplies
& spreads it’s love around !
One such tiny heart did just that & in the process gave
me a designing idea.
I’ve always found it difficult to design a 2D piece with
regular/repetitive elements – how to connect elements, how to jump to the next
element nicely, how long/short should the chains be, how large/small should the
rings be, where should the joining picots be, etc. etc. etc. After all, the
final piece Must lie flat !!!
As late entrants to the online tatting world, we have a huge
advantage, alongside a minor disadvantage ! With all the wonderful tutorials,
patterns, tips & techniques shared freely, we don’t have to reinvent the
tatting wheel. So this technique may not come as a surprise to experienced & creative tatters. But for me, it was like finally breaking the glass
ceiling on 2D tatting design creation.
So, here is a slice of my own joy in taking a step up the
learning ladder!
Peace and Tolerance Tiny Heart designed by Mónica Manceñido seemed like (and is) a very simple pattern.
Ah, but appearances can be so deceptive . Why ? Because it hides within it the
potential to multiply into varied shapes & patterns in a repeatable
arrangement. It is an immensely versatile & adorable little heart :-) It is quite the stash-buster too .
 |
| Peace & Tolerance Tiny Heart |
 |
| Diamond from Peace & Tolerance Tiny Heart |
- I used Anchor Mercer Crochet Size 20. Red - 046
- For heart motifs, an SSSR (Single Shuttle Split Ring) to end, thus avoiding tying, cutting, hiding ends.
- The diamond motif (above right), is a simple mirror image, without changing stitch count.
- To avoid sewing in tails, I did a split chain to end.
As a designing element, it is a tatter’s delight !!!
(All the following images are simply a "playing around" with the 6 hearts & 1 diamond that I tatted, trying to see how different placements throw up different patterns)
Multiples of these hearts, with picots in appropriate places, can be combined & adapted to create larger motifs, beautiful diamond shapes, edgings, bookmarks, crosses, insertions, medallions, snowflakes, motifs, bracelets, pendants, necklaces, etc. even butterflies ….
I . Adding Picots
Once the placement has been finalized, identify the points
where they would join to each other. These are the points where a picot is
required. Hence, make sure to add a picot at all the required places.
In the images below, I have not explicitly shown the picots ; they can be visualized easily enough.
II . Joining Individual Motifs
When designing for beginners, one can tat each motif
individually, and join as required.
So, start with 1 complete motif (this could be either the
tiny heart or the diamond, with picots incorporated). Tie & cut threads.
Start 2nd motif & join to corresponding picot on 1st
; complete & tie & cut. Start 3rd, & join to 2nd
and so on, till you get your desired shape & size.

For tatting patterns in one-pass:
III . Split Rings
But we now look for motifs/patterns that can be done in one
pass, with as little tying & cutting as possible. That’s when Split Rings,
& similar techniques come into play.
Without changing stitch counts in all the following arrangements, one can complete the entire
pattern in one pass, using SRs in the right places.


UPDATE (Aug 2018) : Using split rings to climb out to next motif -
IV . Changing An Element
For some, one may need to change an element. Eg. a ring may
be changed to chains, thus facilitating a return back to the start , without
any breaks in between. Split Rings may still be required.


♥♥♥♥♥♥♥♥
One can even consider Eliminating an element wherever required !
Or how about adding another round to the placement !
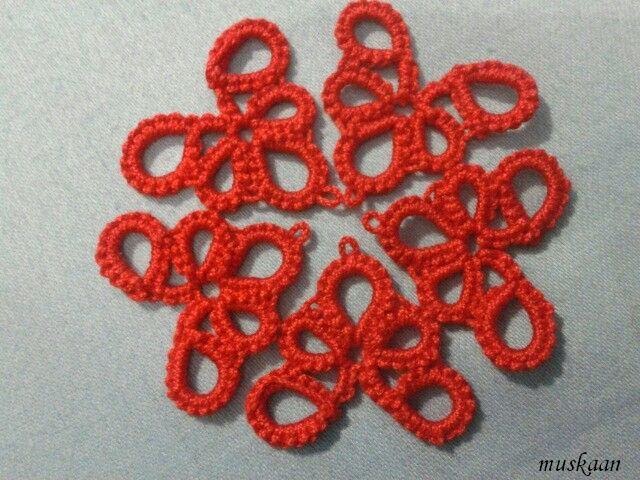
By positioning tiny motifs farther apart, one can get a hexagon, octagon, or other polygonal structures.
The mind boggles at all the possibilities !
V . Adding an element :
By positioning tiny motifs farther apart, one can get a hexagon, octagon, or other polygonal structures.
The mind boggles at all the possibilities !
♥♥♥♥♥♥♥♥
V . Adding an element :
The 5-heart motif can also be done in one pass by Adding a chain & using
SRs. (as shown by black lines in the figure below) Or one
can add longer chains & an occasional ring around the periphery as a 2nd
round.

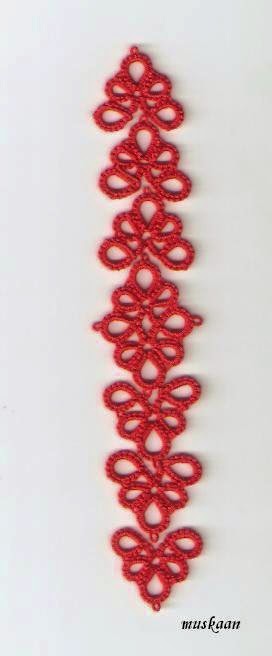
VI . Eliminating an element :

Here is an example of a pattern Within a pattern.
 The adjoining edging can be made in one pass by eliminating the 2
larger rings on either side &
keeping only the clovers, joined in alternating orientations with SRs. (as shown by the black over-lines in lower figure)
The adjoining edging can be made in one pass by eliminating the 2
larger rings on either side &
keeping only the clovers, joined in alternating orientations with SRs. (as shown by the black over-lines in lower figure)
♥♥♥♥♥♥♥♥
Yeah, all this may have been done before. Even so, who can deny us our "tiny", simple little pleasures ;-))
This beginner-level tiny heart is good practice for any novice designer, just starting out or for someone who is facing a tatter's block . Or for somebody who is impatient & lazy ;-))
TIP : Triangles & squares are perfect for a beginner in designing, because adjacent motifs snug up well together. Circles, on the other hand, leave more gaps/spaces between them that may require additional patterns to fill up.
I have only depicted small arrangements & braids. These can very well form the basis of larger coasters, mats, & doilies, too.
Some may require a Split Chain, a Split Ring, a Mock Ring, or some other
advanced technique to make, connect, or move to next element. Since I have not Actually tatted
them, only arranged them & taken photos, I cannot claim that All of these
will actually turn out the way they are photographed. These are possibilities to try out. And more importantly, this is
one way of creating a design/pattern easily, using existing tiny motifs – be it
in the shape of a triangle, square, circle, & so on.
♥♥♥♥♥♥♥♥
In my next post, I will share the pattern for a 3D Poppy flower based on this very Tiny Heart pattern.
It is my first time incorporating classic or vintage design
elements in a
free-form dimensional pattern & I’m modestly proud of it - my "best" pattern to date ;-P
Hope you join me next time as well ...
♥♥♥♥♥♥♥♥
One single "Tiny" heart, a heart that symbolizes love, has spawned so many patterns...
That is what Love is all about - spread it around .....
Cheers !!!
UPDATE : The pattern for 3D Poppy Flower, is uploaded in 2 parts. I will convert to pdf file soon.
Tiny Heart Poppy pattern Part 1
Tiny Heart Poppy pattern Part 2
Tiny Heart Poppy pattern Part 1
Tiny Heart Poppy pattern Part 2
Motif #16 for 25 Motif Challenge
Wow, amasing what you can do with a litle motif!
ReplyDeleteWell done.
Maria, it is so nice to have you here! You are an amazing designer & I LOVE your Ankars-style butterfly, etc. :-)
DeleteThank you for your comment & hope to see more of you & your work in future.
So many possibilities from one little motif. I may tackle that cross. Thanks for the inspiration.
ReplyDeleteHappy to see you inspired & ready to create one of these possibilities. I like the cross pattern myself - very contained & complete !
DeleteWaiting eagerly ....
Thanks :-)
Like lego blocks! Ingenious to join the motif in so many ways.
ReplyDeleteExactly !!!
DeleteAnd Jane, this is just the tip of the iceberg, isn't it ?!
I deliberately kept it as basic as possible.
Thank you :-)
Hi muskaan, thank you for your comment on my blog :)
ReplyDeleteI am in awe of your persistence and attention to detail in all of your tatting experiments. You have so many tests of different ideas, I cannot even begin to keep up with them! Piecing together tatted bits is a great way to formulate designs, especially those that use repetitive motifs. I had a bit of a play with it a few months ago, but didn't get very far as I was in iPad design mode. It is definitely worth taking a second look at when I have the time.
Robin, these 'experiments' are as much for myself as for sharing :-)
DeleteAnd it takes me less time to Actually tat the project than to blog about it - all the drafts, words, arrangement, sequence, pics, ..... This particular post was on the draftboard for almost 2 weeks, before I could get it out in some cogent format.
Will be looking forward to your own designs, which I admire very much :-)
Awesome design work!!! :)
ReplyDeleteThank you, Sue :-))
DeleteWould you be inspired to try out one of these - the cross, for example ?
Hi muskaan, back when you posted this reply I didn't come back and check to see if you replied. I see this now and would love to try to tat the cross!!! I am looking for something a little different to do and that would be a great idea if you still have it. Sorry it's taken almost 3 years to see this.
DeleteSue, it's never too late :-)
DeleteBut I have dallied so much and am quite ashamed to say that I didn't work on any of these design ideas. However, I'll send you the basic stitchcount & path and we can work it out together if required. Give me a couple of days please
Using just a little motif you have come up with some great designs and wonderful ideas.
ReplyDeleteWell done
Maegaret
Thank you for your kind words, Margaret :-))
DeleteI hope the 3D flower is equally well-received .... Still slogging away at writing out the pattern ...
Ahh the love multiplies! very nice designs and in some ways it is like playing with tangrams, I have something to add to this that may help. When I design like this, I leave out picots too then I take a very small crochet hook and when I want, and where I want, as I am tatting I add it together like adding a bead. I count a double stitches and write it down, I could use all of the sample ones you have made up and connect them while starting another. Hopefully I am making sense. Thanks for visiting my blog I wonder why you can't see all the pictures? are you on a phone? I do plan to put my pattern on a PDF soon. :)
ReplyDeleteDear Carollyn,
DeleteWow, I had the exact same thought of tangrams ;-p
Excellent idea about using the crochet hook to join as one goes along !!! It makes things/ trials doubly fast and easy. Less chance of mis-trials and frustration. Thanks for sharing this
Lovely tip.
Yes, I'm on my tablet, but even so, I have been encountering this problem on compy too. Luckily it is temporary, but quite exacerbating, coz I then must remember to revisit.
Thank you... :-))
Loved following the moves, muskaan!
ReplyDeleteJudith C.
Dear Judith,
DeleteYou can't imagine how happy you made me, by dropping by and leaving a comment ! Your input and/or intervention is Always welcome and highly valued :-)
I enjoyed trying to figure out the sequence for tatting the samplers in one pass , or whether it was even possible. It's like a maze puzzle ;-)
Thanks for all you share :-)
An amazing post, as usual! Your research and experiments are impressive!
ReplyDeleteIndeed triangles and diamonds are versatile! I'm surprised Sue didn't mention her own experiments with a small triangle from an antique pattern, where she creates an amazing 'fabric' piece by joining the small triangles. If you check out my blog post below, I link to Sue's experiments, which inspired me to also try out the idea; and quite by accident while working with Lizbeth's Jelly Bean thread I was able to manipulate the color of the triangle which led to an interesting effect!. I still haven't experimented with other variegated threads, but this one ball of Jelly Bean worked magically for me! My post is dated April 21, 2011.
http://kathysvictoriantattedlace.blogspot.com/search?q=tulip .
And Jane Eborall made a fabulous 'fabric mat' using a diamond pattern and color threads that is just mind-boggling. You can read about the progression of her very colorful mat by typing 'diamond mat' in her search bar. It looks like a quilt! . She completed it in September 2011.
Dear Kathy,
DeleteThank you So much for your kind words & all the links - such beautiful tatting & experiments have been showcased so clearly !!
Like I said in my intro, we are following in the footsteps of all you wonderful tatters. Many a times we come up with similar ideas, and rarely, we might make some little original contribution. But we have the advantage of being able to learn from all of you because you have shared so freely :-)
I went through all the links & had a great time :-) Thanks again, for taking the time to read through & leave a comment - it is always a pleasure :-)
I'm always sad for my lack of creativity.
ReplyDeleteBut now I have a little courage to design tatting works thanks to this article.
Oh Lee, I would Love to see your creations ! Don't be sad or fearful - we all start somewhere & somehow.... I'm so glad this article has helped & motivated you. And this is just One of the Many ways that one can create a design. Do go through Kathy's post that she mentions in her comment, & through there to all the other links, for some wonderful tatting designs created by another tiny triangle, and be inspired :-))
DeleteWishing you all the very best :-)
This post is so inspiring! I love tangram, too :)
ReplyDeleteThank you, Ninetta :-)
DeleteWhile trying to 'fit' the motifs, it also felt like doing a jigsaw puzzle - another of my favorite board games !